Cloudpods + Rook + Ceph: 轻松实现云原生的超融合私有云
背景介绍
Cloudpods 服务以容器化的方式运行在 Kubernetes 集群之上,按照部署文档/多节点安装文档部署完 Cloudpods 之后,环境就有了一个完整的 Kubernetes 集群。
但 Cloudpods 内置私有云虚拟机使用的是本地存储,本文主要介绍使用 Rook 在 Cloudpods Kubernetes 集群里面的计算节点上部署 Ceph 集群,然后把 Rook 管理的 Ceph 集群暴露出来对接 Cloudpods 的私有云虚拟机。
Cloudpods 内置私有云提供虚拟化功能, Rook 管理的 Ceph 提供分布式存储,并且这些服务都是容器化,基于 Kubernetes 运行的。Cloudpods 运行虚拟机的节点也叫计算节点,计算节点也是 Kubernetes 的 Node,只要计算节点上有独立的裸盘,就可以使用 Rook 把 Ceph 部署到计算节点上,把这些技术结合起来可以轻松实现一个云原生的超融合私有云。
环境准备
其中 Ceph 相关的环境准备工作和限制可以参考 Rook 提供的文档:https://rook.io/docs/rook/v1.7/pre-reqs.html。
使用 Rook 部署 Ceph
接下来介绍使用 Rook 在已有的 Cloudpods Kubernetes 集群上部署 Ceph 集群,这里有个前提是已经按照部署文档/多节点安装文档,部署了一个多节点的 Cloudpods 集群。
假设已有的 3 个节点为 node-{0,1,2},每个节点的磁盘信息如下,sd{b,c,d} 都是没有分区的裸盘,留给 Ceph 使用:
$ lsblk
NAME   MAJ:MIN RM   SIZE RO TYPE MOUNTPOINT
sda      8:0    0 931.5G  0 disk
├─sda1   8:1    0     1M  0 part
├─sda2   8:2    0   512M  0 part /boot
└─sda3   8:3    0   931G  0 part /
sdb      8:16   0 931.5G  0 disk
sdc      8:32   0   3.7T  0 disk
sdd      8:48   0   3.7T  0 disk
使用 kubectl get nodes 可以看到已经在 Kubernetes 集群中的节点:
$ kubectl get nodes
NAME      STATUS   ROLES    AGE   VERSION
cloudbox  Ready    master   34d   v1.15.9-beta.0
node-0    Ready    <none>   12d   v1.15.9-beta.0
node-1    Ready    <none>   11d   v1.15.9-beta.0
node-2    Ready    <none>   11d   v1.15.9-beta.0
然后给对应的节点打上 role=storage-node 的标签:
# 打标签
$ kubectl label node node-0 role=storage-node
$ kubectl label node node-1 role=storage-node
$ kubectl label node node-2 role=storage-node

# 查看标签对应的节点
$ kubectl get nodes -L role
NAME       STATUS   ROLES    AGE   VERSION          ROLE
cloudbox   Ready    master   34d   v1.15.9-beta.0
node-0     Ready    <none>   12d   v1.15.9-beta.0   storage-node
node-1     Ready    <none>   11d   v1.15.9-beta.0   storage-node
node-2     Ready    <none>   11d   v1.15.9-beta.0   storage-node
另外执行 climc host-list 命令(climc 是云平台的命令行工具),也可以看到这 3 个节点作为 Cloudpods 的计算节点加入到了云平台:
$ climc host-list
+--------------------------------------+----------+-------------------+----------------+--------------+-----------------------------+---------+---------+-------------+----------+-----------+------------+------------+--------------+------------+
|                  ID                  |   Name   |    Access_mac     |   Access_ip    |   Ipmi_Ip    |         Manager_URI         | Status  | enabled | host_status | mem_size | cpu_count | node_count |     sn     | storage_type | host_type  |
+--------------------------------------+----------+-------------------+----------------+--------------+-----------------------------+---------+---------+-------------+----------+-----------+------------+------------+--------------+------------+
| 0d8023ad-ebf9-4a3c-8294-fd170f4ce5c6 | node-0   | 38:ea:a7:8d:94:78 | 172.16.254.127 | 172.16.254.2 | https://172.16.254.127:8885 | running | true    | online      | 128695   | 32        | 2          | 6CU3505M2G | rotate       | hypervisor |
| c02470b3-9666-46f7-852e-9bda8074a72e | node-1   | ec:f4:bb:d7:c4:e0 | 172.16.254.124 | 172.16.254.5 | https://172.16.254.124:8885 | running | true    | online      | 96432    | 48        | 2          | 62CNF52    | rotate       | hypervisor |
| 5811c2d9-2b45-47e4-8c08-a5d479d03009 | node-2   | d4:ae:52:7e:90:9c | 172.16.254.126 | 172.16.254.3 | https://172.16.254.126:8885 | running | true    | online      | 128723   | 24        | 2          | 8Q1PB3X    | rotate       | hypervisor |
+--------------------------------------+----------+-------------------+----------------+--------------+-----------------------------+---------+---------+-------------+----------+-----------+------------+------------+--------------+------------+
下载 Rook 相关代码:
# clone rook 源码
$ git clone --single-branch --branch release-1.7 https://github.com/rook/rook.git
$ cd rook
部署 rook operator 服务:
# apply rook 相关 CRD
$ cd cluster/examples/kubernetes/ceph/pre-k8s-1.16/
$ kubectl apply -f crds.yaml

# apply rook operator 服务
$ cd ..
$ kubectl apply -f common.yaml -f operator.yaml

# 查看 operator 服务的状态,等待 rook-ceph-operator pod 变为 Running
$ kubectl -n rook-ceph get pods
NAME                                  READY   STATUS    RESTARTS   AGE
rook-ceph-operator-68964f4b87-pc87m   1/1     Running   0          7m38s
首先根据自己的环境,修改 rook 提供的 cluster.yaml 里面的内容:
$ cp cluster.yaml cluster-env.yaml
下面是修改后的 cluster.yaml 和 cluster-env.yaml 的 diff 内容:
$ diff -u cluster.yaml cluster-env.yaml
请根据自己的节点环境配置,参考 diff 修改,需要注意的地方如下:
--- cluster.yaml    2021-10-09 10:49:53.731596210 +0800
+++ cluster-env.yaml    2021-10-09 17:50:01.859112585 +0800
@@ -21,7 +21,7 @@
     # versions running within the cluster. See tags available at https://hub.docker.com/r/ceph/ceph/tags/.
     # If you want to be more precise, you can always use a timestamp tag such quay.io/ceph/ceph:v16.2.6-20210918
     # This tag might not contain a new Ceph version, just security fixes from the underlying operating system, which will reduce vulnerabilities
-    image: quay.io/ceph/ceph:v16.2.6
+    image: registry.cn-beijing.aliyuncs.com/yunionio/ceph:v14.2.22
     # Whether to allow unsupported versions of Ceph. Currently `nautilus`, `octopus`, and `pacific` are supported.
     # Future versions such as `pacific` would require this to be set to `true`.
     # Do not set to true in production.
@@ -81,7 +81,7 @@
     rulesNamespace: rook-ceph
   network:
     # enable host networking
-    #provider: host
+    provider: host
     # enable the Multus network provider
     #provider: multus
     #selectors:
@@ -135,22 +135,22 @@
   # To control where various services will be scheduled by kubernetes, use the placement configuration sections below.
   # The example under 'all' would have all services scheduled on kubernetes nodes labeled with 'role=storage-node' and
   # tolerate taints with a key of 'storage-node'.
-#  placement:
-#    all:
-#      nodeAffinity:
-#        requiredDuringSchedulingIgnoredDuringExecution:
-#          nodeSelectorTerms:
-#          - matchExpressions:
-#            - key: role
-#              operator: In
-#              values:
-#              - storage-node
-#      podAffinity:
-#      podAntiAffinity:
-#      topologySpreadConstraints:
-#      tolerations:
-#      - key: storage-node
-#        operator: Exists
+  placement:
+    all:
+      nodeAffinity:
+        requiredDuringSchedulingIgnoredDuringExecution:
+          nodeSelectorTerms:
+          - matchExpressions:
+            - key: role
+              operator: In
+              values:
+              - storage-node
+      podAffinity:
+      podAntiAffinity:
+      topologySpreadConstraints:
+      tolerations:
+      - key: storage-node
+        operator: Exists
 # The above placement information can also be specified for mon, osd, and mgr components
 #    mon:
 # Monitor deployments may contain an anti-affinity rule for avoiding monitor
@@ -207,8 +207,8 @@
 #    osd: rook-ceph-osd-priority-class
 #    mgr: rook-ceph-mgr-priority-class
   storage: # cluster level storage configuration and selection
-    useAllNodes: true
-    useAllDevices: true
+    useAllNodes: false
+    useAllDevices: false
     #deviceFilter:
     config:
       # crushRoot: "custom-root" # specify a non-default root label for the CRUSH map
@@ -219,17 +219,22 @@
       # encryptedDevice: "true" # the default value for this option is "false"
 # Individual nodes and their config can be specified as well, but 'useAllNodes' above must be set to false. Then, only the named
 # nodes below will be used as storage resources.  Each node's 'name' field should match their 'kubernetes.io/hostname' label.
-    # nodes:
-    #   - name: "172.17.4.201"
-    #     devices: # specific devices to use for storage can be specified for each node
-    #       - name: "sdb"
-    #       - name: "nvme01" # multiple osds can be created on high performance devices
-    #         config:
-    #           osdsPerDevice: "5"
-    #       - name: "/dev/disk/by-id/ata-ST4000DM004-XXXX" # devices can be specified using full udev paths
-    #     config: # configuration can be specified at the node level which overrides the cluster level config
-    #   - name: "172.17.4.301"
-    #     deviceFilter: "^sd."
+    nodes:
+      - name: "node-0"
+        devices: # specific devices to use for storage can be specified for each node
+          - name: "sdb"
+          - name: "sdc"
+          - name: "sdd"
+      - name: "node-1"
+        devices:
+          - name: "sdb"
+          - name: "sdc"
+          - name: "sdd"
+      - name: "node-2"
+        devices:
+          - name: "sdb"
+          - name: "sdc"
+          - name: "sdd"
     # when onlyApplyOSDPlacement is false, will merge both placement.All() and placement.osd
     onlyApplyOSDPlacement: false
   # The section for configuring management of daemon disruptions during upgrade or fencing.
编辑好 cluster-env.yaml 后,使用下面的命令创建 ceph 集群:
$ kubectl apply -f cluster-env.yaml
cephcluster.ceph.rook.io/rook-ceph created

# 查看 rook-ceph namespace 里面的 pod 健康状况
$ kubectl -n rook-ceph get pods
NAME                                                 READY   STATUS      RESTARTS   AGE
rook-ceph-crashcollector-dl380p-55f6cc56c9-b8ghc     1/1     Running     0          3m3s
rook-ceph-crashcollector-r710-7d8659858-mrqgq        1/1     Running     0          2m20s
rook-ceph-crashcollector-r720xd-1-5b686487c5-hvzdb   1/1     Running     0          3m10s
rook-ceph-csi-detect-version-ffdsf                   0/1     Completed   0          26m
rook-ceph-mgr-a-759465b6c7-cslkp                     1/1     Running     0          3m13s
rook-ceph-mon-a-657c4c6769-ljtr9                     1/1     Running     0          18m
rook-ceph-mon-b-7db98b99d4-99pft                     1/1     Running     0          18m
rook-ceph-mon-c-7f84fc475d-5v599                     1/1     Running     0          10m
rook-ceph-operator-68964f4b87-pc87m                  1/1     Running     0          68m
rook-ceph-osd-0-7cc5cb94cb-dxznm                     1/1     Running     0          2m32s
rook-ceph-osd-1-f4d47ddf9-7vgh7                      1/1     Running     0          2m35s
rook-ceph-osd-2-5d7667b8d8-d5tnp                     1/1     Running     0          2m20s
rook-ceph-osd-3-c9c56cd77-8sbzj                      1/1     Running     0          2m32s
rook-ceph-osd-4-88565589c-rnpmg                      1/1     Running     0          2m35s
rook-ceph-osd-5-7d7c554b6c-pvsfx                     1/1     Running     0          2m35s
rook-ceph-osd-6-6c7596c844-jg9qt                     1/1     Running     0          2m20s
rook-ceph-osd-7-55f9987ddf-pjthz                     1/1     Running     0          2m32s
rook-ceph-osd-8-6949b69dd6-685wp                     1/1     Running     0          2m20s
rook-ceph-osd-prepare-dl380p-c6nc8                   0/1     Completed   0          3m3s
rook-ceph-osd-prepare-r710-zkmjz                     0/1     Completed   0          3m3s
rook-ceph-osd-prepare-r720xd-1-fswnf                 0/1     Completed   0          3m2s

# 查看 ceph 集群的健康状况
$ kubectl -n rook-ceph get cephcluster
NAME        DATADIRHOSTPATH   MONCOUNT   AGE   PHASE   MESSAGE                        HEALTH
rook-ceph   /var/lib/rook     3          29m   Ready   Cluster created successfully   HEALTH_OK
ceph 集群部署完后,我们需要部署 toolbox.yaml pod 获取集群连接信息:
$ kubectl apply -f toolbox.yaml
deployment.apps/rook-ceph-tools created

$ kubectl -n rook-ceph get pods | grep tools
rook-ceph-tools-885579f55-qpnhh                      1/1     Running     0          3m44s

# 进入 toolbox pod
$ kubectl -n rook-ceph exec -it $(kubectl -n rook-ceph get pod -l "app=rook-ceph-tools" -o jsonpath='{.items[0].metadata.name}') -- bash
# 查看 mon_host 为: 172.16.254.126:6789,172.16.254.124:6789,172.16.254.127:6789
[root@rook-ceph-tools-885579f55-qpnhh /]$ cat /etc/ceph/ceph.conf
[global]
mon_host = 172.16.254.126:6789,172.16.254.124:6789,172.16.254.127:6789

[client.admin]
keyring = /etc/ceph/keyring

# 查看 keyring 为: AQBHTWFhFQzrORAALLIngo/OOTDdnUf4vNPRoA==
[root@rook-ceph-tools-885579f55-qpnhh /]$ cat /etc/ceph/keyring
[client.admin]
key = AQBHTWFhFQzrORAALLIngo/OOTDdnUf4vNPRoA==

# 查看集群健康状态
[root@rook-ceph-tools-885579f55-qpnhh /]$ ceph status
  cluster:
    id:     233cf123-7a1a-4a7b-b6db-1cee79ec752b
    health: HEALTH_OK

  services:
    mon: 3 daemons, quorum a,b,c (age 38m)
    mgr: a(active, since 33m)
    osd: 9 osds: 9 up (since 33m), 9 in (since 34m); 30 remapped pgs

  data:
    pools:   1 pools, 256 pgs
    objects: 0 objects, 0 B
    usage:   57 MiB used, 20 TiB / 20 TiB avail
    pgs:     226 active+clean
             30  active+clean+remapped

# 查看 osd 状态,可以发现对应节点的设备都添加了进来
[root@rook-ceph-tools-885579f55-qpnhh /]$ ceph osd status
ID  HOST    USED  AVAIL  WR OPS  WR DATA  RD OPS  RD DATA  STATE
 0  node-0  6172k  3725G      0        0       0        0   exists,up
 1  node-1  7836k   279G      0        0       0        0   exists,up
 2  node-2  5596k   931G      0        0       0        0   exists,up
 3  node-0  6044k  3725G      0        0       0        0   exists,up
 4  node-1  5980k   279G      0        0       0        0   exists,up
 5  node-1  5980k   279G      0        0       0        0   exists,up
 6  node-2  6236k  3726G      0        0       0        0   exists,up
 7  node-0  7772k  3725G      0        0       0        0   exists,up
 8  node-2  7836k  3726G      0        0       0        0   exists,up

# 创建一个 cloudpods-test 的 pool 用于后面的虚拟机测试
[root@rook-ceph-tools-885579f55-qpnhh /]$ ceph osd pool create cloudpods-test 64 64
pool 'cloudpods-test' created

# 初始化这个pool 为 RBD
[root@rook-ceph-tools-885579f55-qpnhh /]$ rbd pool init cloudpods-test

[root@rook-ceph-tools-885579f55-qpnhh /]$ ceph osd lspools
1 cloudpods-test
Cloudpods 虚拟机使用 Rook 部署的 Ceph
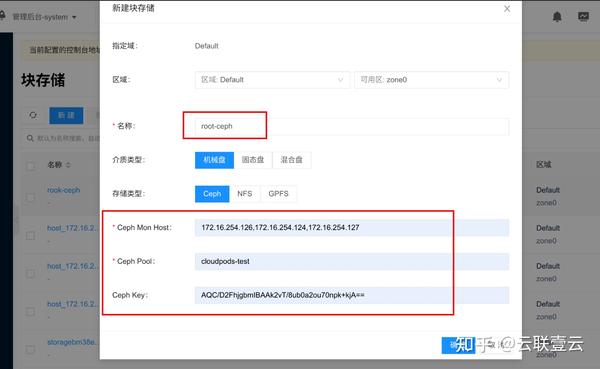
通过之前的步骤,已经使用 Rook 在 Kubernetes 集群里面部署了 Ceph 集群,接下来将 Ceph 集群的连接信息导入到 Cloudpods 私有云平台,就可以给虚拟机使用了。
从之前的步骤得到 ceph 的连接信息如下:
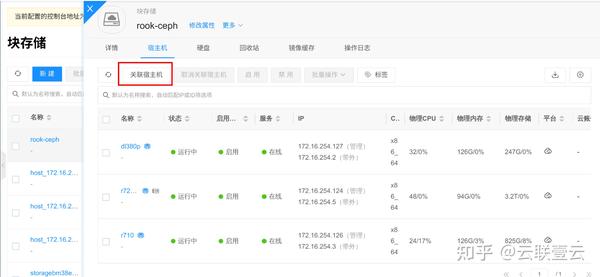
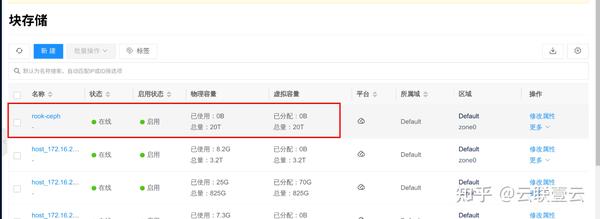
然后登录 cloudpods 前端创建 ceph rbd 存储并且关联宿主机,操作如下:
1、创建名为 rook-ceph 的块存储,填入上面的信息:
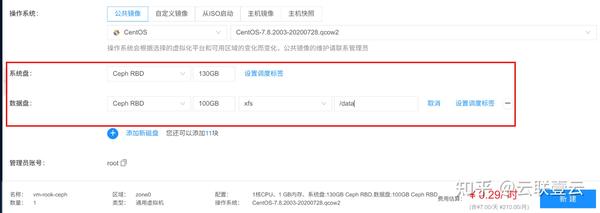
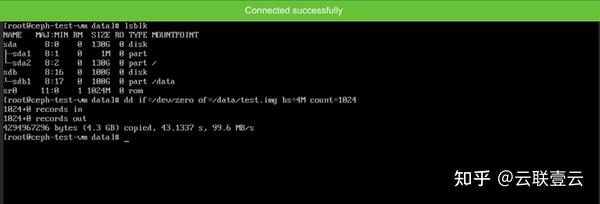
可以发现虚拟机里面挂载了 /dev/sda(系统盘) 和 /dev/sdb(数据盘),底层都为 ceph 的 RBD 块设备,因为 ceph 底层块设备用的机械盘,用 dd 简单测试速度在 99 MB/s ,符合预期。
$ climc server-list --details --search ceph-test-vm
+--------------------------------------+--------------+--------+---------------+--------+---------+------------+-----------+------------+---------+
|                  ID                  |     Name     |  Host  |     IPs       |  Disk  | Status  | vcpu_count | vmem_size | Hypervisor | os_type |
+--------------------------------------+--------------+--------+---------------+--------+---------+------------+-----------+------------+---------+
| ffd8ec7c-1e2d-4427-89e0-81b6ce184185 | ceph-test-vm | node-1 | 172.16.254.252| 235520 | running | 2          | 2048      | kvm        | Linux   |
+--------------------------------------+--------------+--------+---------------+--------+---------+------------+-----------+------------+---------+
其它操作
查看并获取完整代码:

